Metode ujicoba blackbox memfokuskan pada keperluan fungsional dari software. Karna itu ujicoba
blackbox memungkinkan pengembang software untuk membuat himpunan kondisi input yang akan melatih
seluruh syarat-syarat fungsional suatu program. Ujicoba blackbox bukan merupakan alternatif dari ujicoba
whitebox, tetapi merupakan pendekatan yang melengkapi untuk menemukan kesalahan lainnya, selain
menggunakan metode whitebox.
Ujicoba blackbox berusaha untuk menemukan kesalahan dalam beberapa kategori, diantaranya :
1. Fungsi-fungsi yang salah atau hilang
2. Kesalahan interface
3. Kesalahan dalam struktur data atau akses database eksternal
4. Kesalahan performa
5. kesalahan inisialisasi dan terminasi
Tidak seperti metode whitebox yang dilaksanakan diawal proses, ujicoba blackbox diaplikasikan
dibeberapa tahapan berikutnya. Karena ujicoba blackbox dengan sengaja mengabaikan struktur kontrol,
sehingga perhatiannya difokuskan pada informasi domain. Ujicoba didesain untuk dapat menjawab pertanyaanpertanyaan
berikut :
1. Bagaimana validitas fungsionalnya diuji?
2. Jenis input seperti apa yang akan menghasilkan kasus uji yang baik ?
3. Apakah sistem secara khusus sensitif terhadap nilai input tertentu ?
4. Bagaimana batasan-batasan kelas data diisolasi?
5. Berapa rasio data dan jumlah data yang dapat ditoleransi oleh sistem?
6. Apa akibat yang akan timbul dari kombinasi spesifik data pada operasi sistem?
Google Search

Custom Search
Showing posts with label Pemrograman Berorientasi Objek. Show all posts
Showing posts with label Pemrograman Berorientasi Objek. Show all posts
Monday, March 21, 2011
Flow Control
Aplikasi komputer tidak akan banyak berguna jika hanya bisa menjalankan satu flow. Bayangkan jika program yang Anda buat hanya menjalankan perintah satu persatu dari atas ke bawah. Jika programnya seperti itu, berarti cuma ada satu variasi masalah yang bisa ditangani. Berubah sedikit saja kondisinya, program tersebut sudah tidak bisa berfungsi lagi. Penanganan berbagai variasi masalah menuntut agar bahasa pemrograman memiliki flow control. Flow control memungkinkan program menentukan kode mana yang akan dijalankan berdasarkan kondisi-kondisi tertentu.
Sebelum melangkah lebih jauh lagi, ada istilah-istilah yang perlu dipahami sehubungan dengan flow control ini, yaitu kondisi dan aksi.
Sebelum melangkah lebih jauh lagi, ada istilah-istilah yang perlu dipahami sehubungan dengan flow control ini, yaitu kondisi dan aksi.
Tuesday, November 16, 2010
METHODS
Definisi Method
-> Kumpulan statement yang dikelompokkan bersama untuk suatu operasi
-> Contoh:
println() pada System.out
showMessageDialog()/showInputDialog() pada JOptionPane
nextInt() pada Scanner
equals() pada String
-> Di dalam method println() dari System.out
Terdiri dari sekumpulan statements
Bertujuan mencetak output ke konsol
Saturday, November 6, 2010
Wednesday, October 13, 2010
Pernyataan Seleksi(Bagian 1)
Pernyataan nested-if
Pernyataan if/if-else yang bersarang
Terdapat if/if-else di dalam if/if-else
if/if-else bagian dalam disebut “bersarang” di dalam if/if-else bagian luar
Tidak ada batasan if/if-else yang bersarang
contoh kode program:

 hasilnya:

Pernyataan if/if-else yang bersarang
Terdapat if/if-else di dalam if/if-else
if/if-else bagian dalam disebut “bersarang” di dalam if/if-else bagian luar
Tidak ada batasan if/if-else yang bersarang
contoh kode program:


Wednesday, October 6, 2010
OPERASI ARITMETIKA (Bagian 3)
Operator Shorthand
-> Variabel yang digunakan, dimodifikasi, dan di-assign ulang pada variabel yang sama
-> Contoh:
i = i + 8
Dapat digantikan menjadi i += 8
-> += disebut addition assignment operator dalam bentuk ringkas (shorthand operator)
-> Operator tidak dipisahkan spasi (harus +=, bukan + =)

-> Contoh:
A = A – 3 -> A -= 3
B = B % 7 -> B %= 7
C = C * 8 -> C *= 8
OPERASI ARITMETIKA (Bagian 2)
Assignment Statements
-> Digunakan untuk pemberian nilai
-> Menggunakan (=) sebagai assignment operator
-> Assignment statements adalah:
Variabel = expression
Assignment Expressions
-> Expression dapat berupa assignment statements, disebut assignment expressions
Arithmetic Expressions
-> Expressions yang melibatkan operator numerik
-> Contoh:
OPERASI ARITMETIKA
Operator Numerik

-> 4 tipe data bilangan bulat pada Java: byte, short, int, dan long
-> 2 tipe data bilangan desimal pada Java: float, dan double
-> Penggunaan bilangan desimal double lebih akurat daripada float
-> Hasil pembagian dari 2 bilangan bulat adalah bilangan bulat
Contoh: 5/2 = 2 (bukan 2.5), hasilnya dibulatkan ke bawah
Wednesday, September 29, 2010
Tipe Data (Bagian4)
Konstanta
->Data permanen yang tidak dapat diubah
Contoh:
π (PHI) = 3.14159 26535 89793 23846 26433 83279 50288 41971 69399 37510
g (gravitation) = 9.8
->Konstanta harus dideklarasikan dan diinisialisasikan pada sebuah statement
final merupakan keyword pada Java untuk pembuatan konstanta
->Deklarasi:
final datatype CONSTANTNAME = VALUE;
Contoh: final double PHI = 3.1415;
Tipe Data (Bagian3)
Type Casting (Conversion)
->Operasi konversi nilai antar tipe data yang berbeda
->Jenis type casting (conversion):
Widening a type: konversi (cast) nilai dari tipe data yang lebih kecil ke
tipe data yang lebih besar (dilakukan secara otomatis oleh Java)
Narrowing a type: konversi (cast) nilai dari tipe data yang lebih besar
ke tipe data yang lebih kecil (diperlukan secara eksplisit)
->Urutan ukuran tipe data
byte, short, int, long, float, double
------------------------------------->
->Sintaks untuk narrowing casting menggunakan tanda kurung “(tipe data)”
Contoh 1:
float f = (float) 10.1;
int i = (int) f;
Contoh 2:
double d = 4.5;
int i = (int) d;
->Pada contoh 1-2 di atas, nilai dari f dan d tidak berubah
contoh kode programnya:
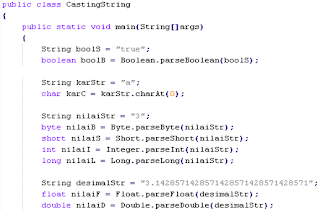
hasilnya adalah:
Tipe Data (Bagian2)
Input / Output (I/O)
-> Komunikasi antara komputer dengan pihak luar (manusia / mesin)
-> Input: Signal/data yang diterima oleh sistem
-> Output: Signal/data yang dikirim dari sistem
-> Proses I/O disebut “I/O perform” atau “I/O Operation”
-> Contoh perangkat input: keyboard, mouse
-> Contoh perangkat output: monitor, printer
-> Contoh perangkat input dan output: disk, file

Tipe Data
Tipe Data
->Merupakan atribut yang memiliki rentangan nilai dan jenisnya (tipe)
->Digunakan untuk menyimpan nilai dan eksekusi operasi
->Berdasarkan nilai yang disimpan:
Boolean (boolean)
Numeric (byte, short, int, long, float, double)
Character (char)
String (String)
->Berdasarkan pembagian:
Atomic DT (boolean, byte, char, short, int, long, float, double)
Composite DT (Array, Struct, List, Queue, Stack, String, Tree)
->Berdasarkan asalnya:
Native / primitive / basic DT (sama dengan Atomic)
Abstract DT (sama dengan Composite)
->Berdasarkan pembuatannya:
Built-in DT (sama dengan Atomic)
User-defined DT (sama dengan Composite)

Saturday, September 25, 2010
Pengantar Bahasa Java (bagian 2)
Anatomi Program Java
Program/aplikasi terdiri dari:
Program/aplikasi terdiri dari:
- Whitespace
- Identifiers
- Literal
- Comments
- Separators
- Reserved words (keyword)
- Modifiers
Pengantar Bahasa Java
Sejarah Java
->Dikembangkan oleh tim
->Pemimpin: James Gosling
->Company: Sun Microsystem
->Agustus 1991, bernama Oak
->Januari 1995, berganti nama Java
->Menjanjikan aplikasi berbasis “Write Once, Run Anywhere (WORA)”
->Dapat dijalankan di web browser dengan teknologi Applet
Karakteristik Java (Buzzwords)
->Dikembangkan oleh tim
->Pemimpin: James Gosling
->Company: Sun Microsystem
->Agustus 1991, bernama Oak
->Januari 1995, berganti nama Java
->Menjanjikan aplikasi berbasis “Write Once, Run Anywhere (WORA)”
->Dapat dijalankan di web browser dengan teknologi Applet
Karakteristik Java (Buzzwords)
- Simple
- Object-oriented
- Distributed
- Interpreted
Thursday, April 2, 2009
Menghitung Umur

ini adalah kode program dari Menghitung Umur dengan menggunakan ConsoleApplication di Visual Studio C# 2005:
using System;
using System.Collections.Generic;
using System.Text;
namespace Menghitung_Umur
{
class Program
{
public static void Main(string[] args)
{
int day;
int month;
int year;
Console.Out.WriteLine("Menghitung Umur ");
Console.Out.WriteLine("====================");
try
{
Console.Out.Write("Masukkan Tanggal: ");
day = Convert.ToInt32(Console.In.ReadLine());
Console.Out.Write("Masukkan Bulan: ");
month = Convert.ToInt32(Console.In.ReadLine());
Console.Out.Write("Masukkan Tahun : ");
year = Convert.ToInt32(Console.In.ReadLine());
DateTime birthDate = new DateTime(year, month, day);
DateTime today = DateTime.Now;
TimeSpan age = today.Subtract(birthDate);
Console.Out.WriteLine("Saat ini umur anda adalah: {0} hari, {1} jam, "
+ "{2} minutes.", age.Days, age.Hours, age.Minutes);
}
catch (FormatException e)
{
Console.Out.WriteLine("Data tanggal, bulan dan tahun harus berupa angka.");
}
catch (Exception e)
{
Console.Out.WriteLine("Terjadi kesalahan: " + e.Message);
}
}
}
}
Selamat Mencoba,
Ridon-Na70
Membuat Kalkulator Sederhana dengan operator +, -, /, *

ini kode program dengan menggunakan Visual Studio C# 2005, yakni dengan menggunakan
Windows Application:
using System;
using System.Collections.Generic;
using System.ComponentModel;
using System.Data;
using System.Drawing;
using System.Text;
using System.Windows.Forms;
namespace Calculator
{
public partial class frm_Calculator : Form
{
public frm_Calculator()
{
InitializeComponent();
}
private void btn_tambah_Click(object sender, EventArgs e)
{
double bil1;
double bil2;
double total;
bil1 = double.Parse(txt_bil1.Text);
bil2 = double.Parse(txt_bil2.Text);
total = bil1 + bil2;
lbl_cetak.Text = total.ToString();
}
private void btn_kurang_Click(object sender, EventArgs e)
{
double bil1;
double bil2;
double total;
bil1 = double.Parse(txt_bil1.Text);
bil2 = double.Parse(txt_bil2.Text);
total = bil1 - bil2;
lbl_cetak.Text = total.ToString();
}
private void btn_bagi_Click(object sender, EventArgs e)
{
double bil1;
double bil2;
double total;
bil1 = double.Parse(txt_bil1.Text);
bil2 = double.Parse(txt_bil2.Text);
total = bil1 / bil2;
lbl_cetak.Text = total.ToString();
}
private void btn_kali_Click(object sender, EventArgs e)
{
double bil1;
double bil2;
double total;
bil1 = double.Parse(txt_bil1.Text);
bil2 = double.Parse(txt_bil2.Text);
total = bil1 * bil2;
lbl_cetak.Text = total.ToString();
}
private void btn_clear_Click(object sender, EventArgs e)
{
txt_bil1.Text = "";
txt_bil2.Text = "";
}
}
}
Nb:
Teman2 mulai mengetik kode program mulai dari btn_tambah_Click sampai btn_clear_Click
Keterangan dari tombol-tombol yang digunakan:
1. txt_bil1 adalah textbox buat bil1
2. txt_bil2 adalah textbox buat bil2
3. btn_tambah adalah button dari +
4. btn_kurang adalah button dari -
5. btn_bagi adalah button dari /
6. btn_kali adalah button dari *
7. btn_clear adalah button dari clear
Selamat Mencoba,
Ridon-Na70
Sunday, February 15, 2009
PENGENALAN .NET
Mengenal.Net
.Net adalah sebuah teknologi yang diciptakan oleh Microsoft untuk pengembangan program-program yang berorientasi objek.
Keistimewaan teknologi .Net bagi para developer:
1. Programmer dapat berpindah dari teknologi yang lama ke teknologi .Net dengan mudah karena adanya kompabilitas .Net dengan teknologi yang lama(Misalnya VB (Visual Basic)6 dengan VB .Net)
2. Dapat membuat interaksi antarprogram walaupun dibuat dengan bahasa pemrograman yang berbeda. Hal ini akan meningkatkan efektivitas kinerja tim yang memiliki programmer dengan penguasaan bahasa pemrograman yang berbeda-beda. Dengan demikian proyek dapat tetap diselesaikan dengan baik, tepat waktu, dan efisien.
3. Dukungan penuh terhadap pengembangan aplikasi internet, seperti teknologi HTML, XML, SOAP, dan HTTP
4. Mendukung banyak bahasa pemrograman, di antaranya Visual C++, C#, VB, dan Java
Dibawah ini adalah gambar dari Platform Microsoft.Net

Teknologi ini mempunyai 4 komponen utama seperti:
1. .Net Framework
2. .Net Buliding Block Services
3. Visual Studio.Net
4. .Net Enterprise Server
1. .Net Framework
.Net Framework adalah sebuah framework atau bingkai kerja bagi aplikasi-aplikasi .Net yang dibuat dengan menggunakan Visual Studio .Net tanpa terpengaruh bahasa pemrograman yang digunakan.
Dibawah ini adalah gambar dari Arsitektur.Net

Berikut ini adalah komponen-komponen dari .Net Framework
-> Common Language Runtime (CLR)
-> Microsoft Intermediate Language (MSIL)
-> Just in Time Compilers (JITers)
-> Framework Class Library (FCL)
-> Common Language Specification(CLS)
-> Common Type System (CTS)
-> Garbage Collection (GC)
2. .Net Buliding Block Services
.Net Building Block Services adalah sekumpulan service yang dapat diakses secara online atau offline
Visual Studio .Net
Visual studio .Net adalah sekumpulan alat pengembangan software yang diperuntukan bagi .Net Platform.
Isi dari Visual Studio.Net antara lain C#, C++.Net, VB.Net, J#, jScript.Net
.Net Enterprise Server
.Net Enterprise Server adalah kumpulan teknologi berbasiskan server yang mendukung
.Net yang mencakup Messaging,Database, Sistem Operasi, atau manajemen e-commerce. Contohnya: Windows Server 2000,2003,Microsoft Exchange Server.
Wednesday, January 21, 2009
Beginning C#
Using Windows Form Controls
In recent years, Visual Basic has won great acclaim for granting programmers the tools for creating highly detailed user interfaces via an intuitive form designer, along with an easy to learn programming language that together produced probably the best environment for rapid application development out there. One of the things that Visual Basic does, and other rapid application development tools, such as Delphi, also does, is provide access to a number of prefabricated controls that the developer can use to quickly build the user interface (UI) for an application.
At the center of most Visual Basic Windows applications stands the form designer. You create a user interface by dragging and dropping controls from a toolbox to your form, placing them where you want them to be when you run the program, and then double-clicking the control to add handlers for the control. The controls provided out of the box by Microsoft along with custom controls that can be bought at reasonable prices, have supplied programmers with an unprecedented pool of reusable, thoroughly tested code that is no further away than a click with the mouse. What was central to Visual Basic is now, through Visual Studio.NET, available to C# programmers.
Most of the controls used before .NET were, and still are, special COM objects, known as ActiveX controls. These are usually able to render themselves at both design and runtime. Each control has a number of properties allowing the programmer to do a certain amount of customization, such as setting the background color, caption, and its position on the form. The controls that we'll see in this chapter have the same look and feel as ActiveX controls, but they are not – they are .NET assemblies. However, it is still possible to use the controls that have been designed for older versions of Visual Studio but there is a small performance overhead because .NET has to wrap the control when you do so. For obvious reasons, when they designed .NET, Microsoft did not want to render the immense pool of existing controls redundant, and so have provided us with the means to use the old controls, even if future controls are built as pure .NET components.
These .NET assemblies can be designed in such a way that you will be able to use them in any of the Visual Studio languages, and the hope and belief is that the growing component industry will latch on, and start producing pure .NET components. We'll look at creating control ourselves in the next chapter.
An in depth explanation of .NET assemblies is provided in Chapter 21. Please refer to it if you want to know more about what an assembly is.
We have already seen the form designer in action, if only briefly, in the examples provided earlier in this book. In this chapter, we'll take a closer look at it, and especially how we use a number of controls, all of which come out of the box with Visual Studio.NET. Presenting all of the controls present in Visual Studio.NET will be an impossible task within the scope of this book, and so we'll be presenting the most commonly used controls, ranging from labelsand text boxes, to list views and status bars.
The Windows Form Designer
We'll start out by taking a brief tour of the Windows Form Designer. This is the main playing ground when you are laying out your user interface. It is perfectly possible to design forms without using Visual Studio.NET, but designing an interface in Notepad can be a quite painful experience.
Let's look at the environment we'll be using. Start Visual Studio.NET and create a new C# Windows Application project by selecting File | New | Project. In the dialog that appears, click Visual C# Projects in the tree to the left and then select Windows Application in the list to the right. For now, simply use the default name suggested by Visual Studio and click OK. This should bring up a window much like the one shown below:

If you are famliar with the forms designer found in Visual Basic you will notice the similarities – obviously someone desided that the designer was a winner and desided to allow it to be used it in other Visual Studio languages as well. If you are not familiar with the Visual Basic designer, then quite a few things are going on in the above screenshot, so let's take a moment and go through the panels one by one.
In the center of the screen is the form that you are designing. You can drag and drop controls from the toolbox onto the form. The toolbox is collapsed in the picture above, but if you move the mouse pointer to the far left of the screen over the Toolbox tab, it will unfold. You can then click the pin at the top right of the panel to pin it down. This will rearrange the work area so that the toolbox is now always on top, and isn't obscuring the form. We'll take a closer look at the toolbox and what it contains shortly.
Also collapsed on the left hand bar is the Server Explorer – represented by the computers icon on top of the toolbox tab. You can think of this as a small version of the Windows Control Panel. From here, you can browse computers on a network, add and remove database connections, and much more.
To the right of the window are two panels. The top-right one is the Solution Explorer and the class view. In the Solution Explorer, you can see all open projects and their associated files. By clicking the tab at the bottom of the Solution Explorer, you activate the Class Viewer. In this, you can browse all of the classes in your projects and all of the classes that they are derived from.
At the bottom right of the screen, is the Properties panel. This panel will contain all of the properties of the selected item for easy reference and editing. We'll be using this panel quite a bit in this chapter.
Also in this panel, the Dynamic Help tab is visible. This panel will show help tips to you for any selected objects and code even while you type. If your computer uses one of the older microprocessors or has a small amount of RAM, then I suggest that you remove this from the panel when it is not needed, as all that searching for help can make performance rather sluggish.
The Toolbox
Let's have a closer look at the toolbox. If you haven't already, move your mouse pointer over the toolbox on the left of the screen, and pin it to the foreground by clicking the pin at the top right of the panel that unfolds:
If you accidentally remove the toolbox by clicking the X instead, you can make it reappear by selecting Toolbox from the View menu, or by pressing Ctrl-Alt-X.

The toolbox contains a selection of all the controls available to you as a .NET developer. In particular, it provides the selection that is of importance to you as a Windows Application developer. If you had chosen to create a Web Forms project, rather than a Windows Application, you would have been given a different toolbox to use. You are not limited to use this selection. You can customize the toolbox to fit your needs, but in this chapter, we'll be focusing on the controls found in the selection that is shown in the picture above – in fact, we'll look at most of the controls that are shown here.
Now that we know where we'll be doing the work, let's look at controls in general.
Controls
Most controls in .NET derive from the System.Windows.Forms.Control class. This class defines the basic functionality of the controls, which is why many properties and events in the controls we'll see are identical. Many of these classes are themselves base classes for other controls, as is the case with the Label and TextBoxBase classes in the diagram below:

Some controls, named custom or user controls, derive from another class: System.Windows.Forms.UserControl. This class is itself derived from the Control class and provides the functionality we need to create controls ourselves. We'll cover this class in Chapter 14. Incidentally, controls used for designing Web user interfaces derive from yet another class, System.Web.UI.Control.
note: "to get information about beginning c# please visit this address: http://www.codeproject.com/KB/books/1861004982.aspx"
Subscribe to:
Posts (Atom)

Masukkan Code ini K1-EY8895-E
untuk berbelanja di KutuKutuBuku.com